Timecard Submission
 . This is essential to the organization as it allows us to plan our work better and to correctly charge projects
  . The time reporting period is Monday to Sunday.
Timecards must be submitted every Monday following the period concerned
. The time reporting period is Monday to Sunday.
Timecards must be submitted every Monday following the period concerned  . If you are on leave or otherwise not at work on the Monday, then you must submit them on the first available opportunity after that point . If you are going on extended leave, submit your Timecards for all periods covered by the leave on the day before you go on leave . You can always submit a correction later if things change.
Here is the Business Portal Web page link
. If you are on leave or otherwise not at work on the Monday, then you must submit them on the first available opportunity after that point . If you are going on extended leave, submit your Timecards for all periods covered by the leave on the day before you go on leave . You can always submit a correction later if things change.
Here is the Business Portal Web page linkTimecard System Introduction
To enter your Timecard you must access a certain web-page on our Business Portal web site. You can create a new Timecard or edit a previously saved Timecard that has not yet been submitted. You add lines to the Timecard detailing the tasks (project or otherwise) you have been working on - or indicate you have been on leave. You specify the hours for each task. You can then save the Timecard for later completion or submit it (so doing each days activities at the end of each day is possible). Your supervisor is notified when you submit a Timecard and is required to check that it makes sense. If they reject it they will talk to your or send you an e-mail message indicating why. You must then return to the Timecard web page and fix the problem. The process below seems complicated, and it is somewhat more complicated then we would like. But you will quickly learn the process and become efficient at it . (Consider that an order") .)
.)
Accessing the Business Portal.
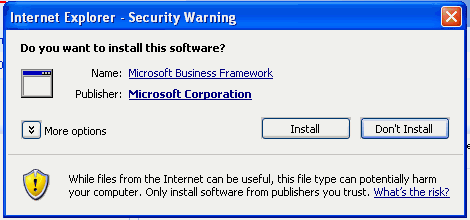
Due to being part of our Microsoft Dynamics SL (Solomon) accounting system - Timecard submission must be done via the Business Portal web site. This is, unfortunately, very much Microsoft centric and you must use Internet Explorer (windows only) to make it work . (We were sold this system on the basis that it did not require IE
  .) But there are schemes which mean you don't need a windows machine as your main machine .
In addition - you need to be logged in on the AAO Domain (either the machine log-in or just the BP log-in). - this is a scheme which allows you to use the one user name and password throughout AAO machines (this similar to the NIS system we use on Unix systems). The domain name is
.) But there are schemes which mean you don't need a windows machine as your main machine .
In addition - you need to be logged in on the AAO Domain (either the machine log-in or just the BP log-in). - this is a scheme which allows you to use the one user name and password throughout AAO machines (this similar to the NIS system we use on Unix systems). The domain name is aao-domain and under this scheme you may need to specify your username as aao-domain\<username> rather then just plain <username>. There will be a password associated with this domain login (at some point to become your main AAO password through both Windows and Unix systems).
Please see BusinessPortalAccess for details about accessing the Business Portal. Once you are logged in - continue below.
Business portal - getting to the Timecard.
Goto the AAO Business Portal Web Site Please select the Project button in the top line of links.
After a while you should now see a page with a link named
Please select the Project button in the top line of links.
After a while you should now see a page with a link named Time down the left hand side. Select that link. This should give you a page like this one 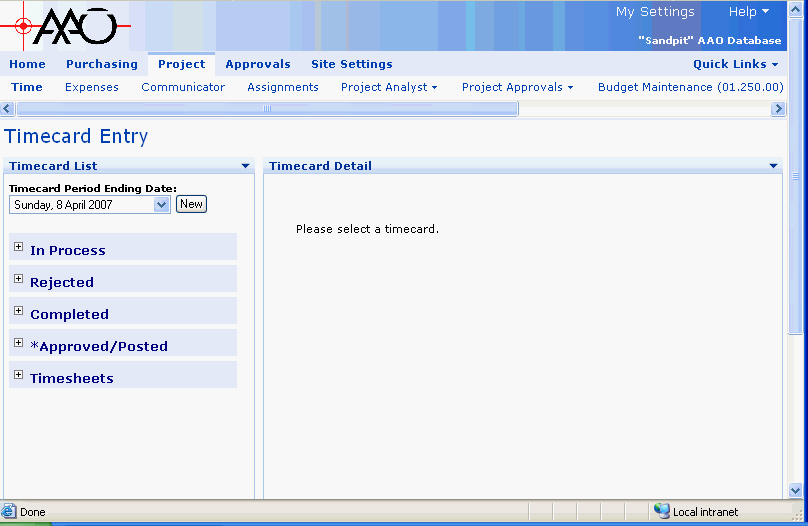 Down the left hand side are the following links/buttons
 - New button
- Invoke this button to create a new Timecard for the period ending date specified with the drop-down list. If a date is missing - it is likely you have already started or submitted a Timecard for the specified week.
- In Progress
- Expand this to see a list of Timecard you have started but not yet submitted.
- Rejected
- Expand this to see a list of Timecard that have been rejected.
- Completed
- Expand this to see a list of Timecard you have submitted but which have not yet been approved.
- Approved/Posted
- Expand this to see a list of Timecard that have been approved. You can create Timecard corrections from here.
- Timesheets
- This one is not used at the AAO.
Timecard layout.
The Timecard will appear to the right of the window - here is a typical layout: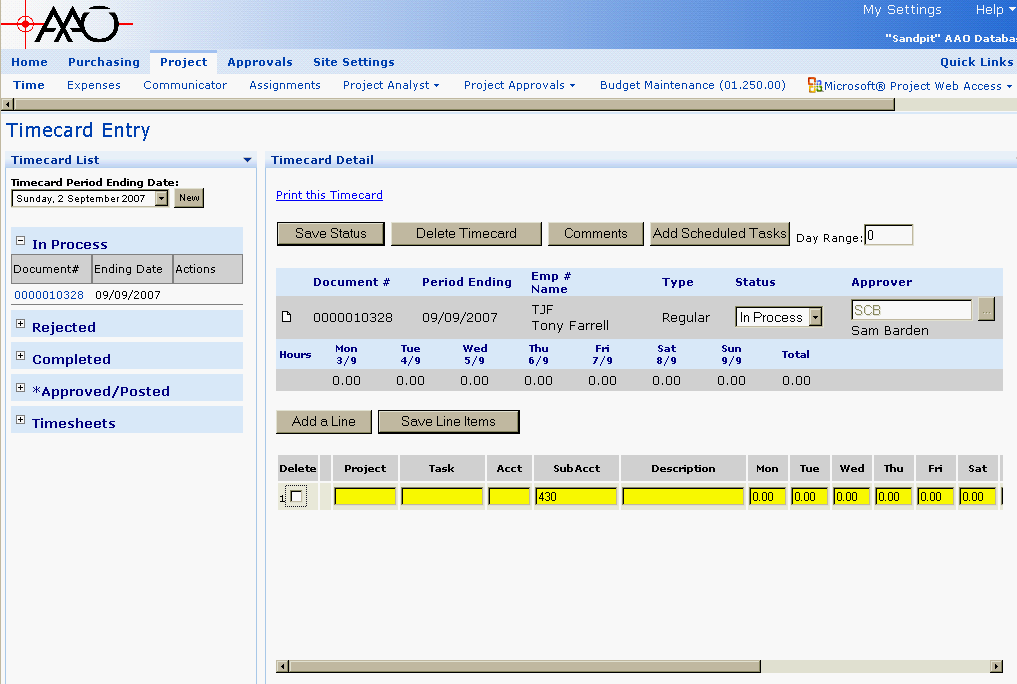 The following image labels each significant item in the Timecard area of the screen
 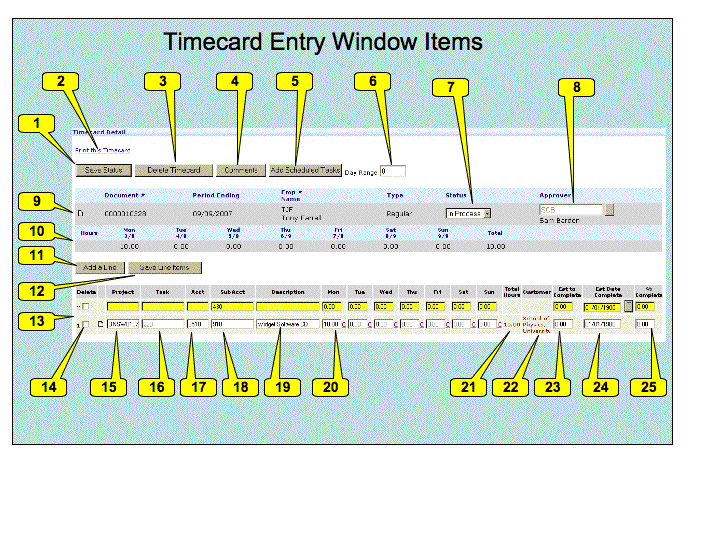 Here are the descriptions of each labeled item.
- The Save Status button - invoked to save the current status of the timesheet. Here we are only dealing with setting the timesheet to In Progress or Completed. If you have not saved the line items at this point you will be warned before losing any line item changes.
- The Print this Timecard link - invoke to produce a printable (but sometimes rather useless) version of the timecard in a new window.
- The Delete Timecard button - invoke to delete this timecard without submitting it (only if status is In Process or Rejected)
- The Comments button - invoke to add comments to be saved with your timecard - typically comments for your supervisor (Timecard approver). This is currently the only place where you should add comments - other comment facilities are not easy for your approver to view
- The Add Scheduled Tasks button - invoke to add a line to your Timecard for every task which you are scheduled to be doing in the period.
- The Day Range entry - when adding schedule tasks, include for this number of days into the future from the current period end date - TBC
 .
.
- The Status of this Timecard. Whilst you are working on it, you should set this to
In Process. To submit this Timecard, set this toCompleted. This value may also beRejectedif your Timecard has been rejected - you can set it back toCompletewhen you have corrected it. The status may also beApproved/Postedwhen your Timecard has been accepted. - The initials of the person who approves you Timecard will appear here. SCB (Sam Barden) in this example. You can't change this.
- Information on this Timecard appears on this row. The "Document #" is a unique system ID number - you can ignore it. The period ending and employee details are then specified, as is the type of Timecard (Regular/Correction). The little white icon is for adding comments - but don't use this feature (it will disappear at some point).
- This line shows the total time you have booked for each day in the period, and the total for the period.
- The Add a Line button - allows you to add a new line to the Timecard. You must add a line for each separate task you have worked on, and for each type of leave.
- The Save Line Items button - allows you to save the current set of line line items. If you have changed the Timecard status at this point, then it will be set back to "In Progress" (you are warned about this). It is highly recommended that you save each line after filling it in
- The detail lines - initially these lines does not exist. Using the Add a line button or the Add Scheduled Tasks button will add lines of this style. When your Timecard is complete you should have one of these lines for each task you have worked on during the period and for each type of leave you have taken (if any) during the period - except for flex leave, don't book that at all. Do not use the commenting facilities on this line - at this stage. They are not viewable by your supervisor .
- The Delete checkbox - if this is selected when you invoke the "Save Line Items" button, then the line in question is deleted.
- The Project entry box - the Solomon ID of the project this line refers to must go here. If you double click this box, you will see a list of projects. The Description field will give you the information you need to select the right project. Just click on the relevant row to select the project. If you linger the mouse over this entry box it will display the project "description"
- The Task entry box - the Solomon ID of the project task this line refers to must go here. If you double click this box, you will see a list of tasks. The Description field will give you the information you need to select the right project. Just click on the relevant row to select the task. More details below. If you linger the mouse over this entry box it will display the task "description"
- The Acct entry box - should be filled in automatically. You can ignore this.
- The SubAcc entry box - should be filled in automatically. You can ignore this.
- The Description entry box - Optional. Add any extra information you wish to provide about this item. Also might be a note to yourself. Defaults to the task description and limitied to about 40 characters.
- The hours entry boxes - enter the number of hours worked on this task per day (decimal hours, NOT hours and minutes).
- The Total Hours item. This is total number of hours you have entered for the task on this time-card (the sum across the line). This is filled in after you have saved the line items.
- The Customer Item. This is the name of the customer for this project. This is filled in after you have saved the line items.
- The Est to Complete item. Enter the number of hours to complete the task in this box. If you do not know this - leave it at zero.
- The Est Date Complete item. Enter the date you expect the task to complete. Ignore (leave set to 01/01/1900) for on-going tasks.
- The % Complete item. Set this if you know it.
Filling in a Timecard
To fill in a Timecard, you should first set a "Day Range" and invoke "Add Scheduled Tasks" to add automatically the list of all tasks you are scheduled to do within the period. If you have not actually worked on one of these tasks you can use the "Delete" check-button to remove it. You can linger the mouse over the Project and Task fields to see a description of the project and task. For each other task you have done or for each type of leave taken, you should use the "Add a Line" button to add a new line. (Project Selection Dialog
For each added line you need to select the project - double click the project entry box to see the list of possible projects. A dialog similar to the one below will appear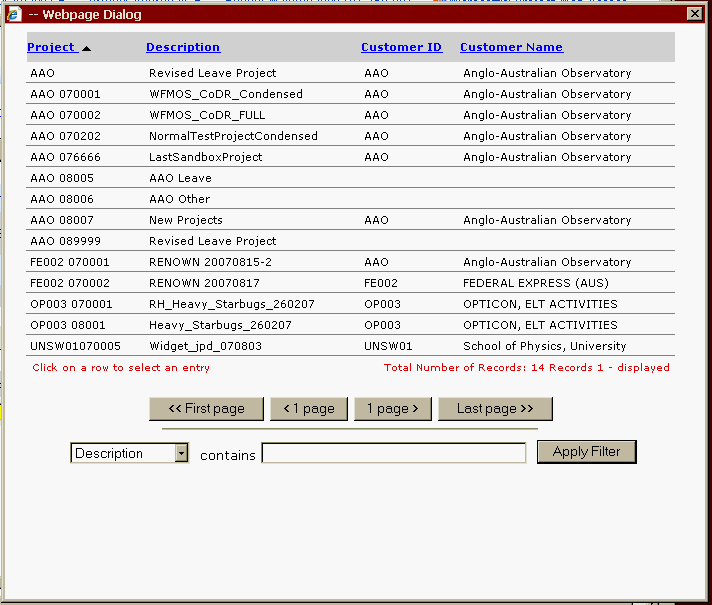 Click once on a line to select that project.
The Description column will give you the most important information - the formal name of the project. The "Project" column is the name by which the project is known within Solomon - which is limited to 12 characters and hence is of limited use.
Use Leave (Task ID AAO 07 A 001) as the project when reporting leave. There are Group Specific Projects listed below for activites internal to each group. Use General Administrative Tasks (Task ID AAO 07 A 002) when non group specific, non project work.
Note that only the first 15 projects are displayed. There are buttons to page through the rest of the available projects or you can use the "Filter" at the bottom. For example - set that drop-down to "Description", enter the first few characters of the description in the entry box and then invoke "Apply Filter".
Click once on a line to select that project.
The Description column will give you the most important information - the formal name of the project. The "Project" column is the name by which the project is known within Solomon - which is limited to 12 characters and hence is of limited use.
Use Leave (Task ID AAO 07 A 001) as the project when reporting leave. There are Group Specific Projects listed below for activites internal to each group. Use General Administrative Tasks (Task ID AAO 07 A 002) when non group specific, non project work.
Note that only the first 15 projects are displayed. There are buttons to page through the rest of the available projects or you can use the "Filter" at the bottom. For example - set that drop-down to "Description", enter the first few characters of the description in the entry box and then invoke "Apply Filter".
Task Selection Dialog
Having selected the project, you can now select the task - double click the task entry box to see the list of possible tasks. A dialog similar to the one below will appear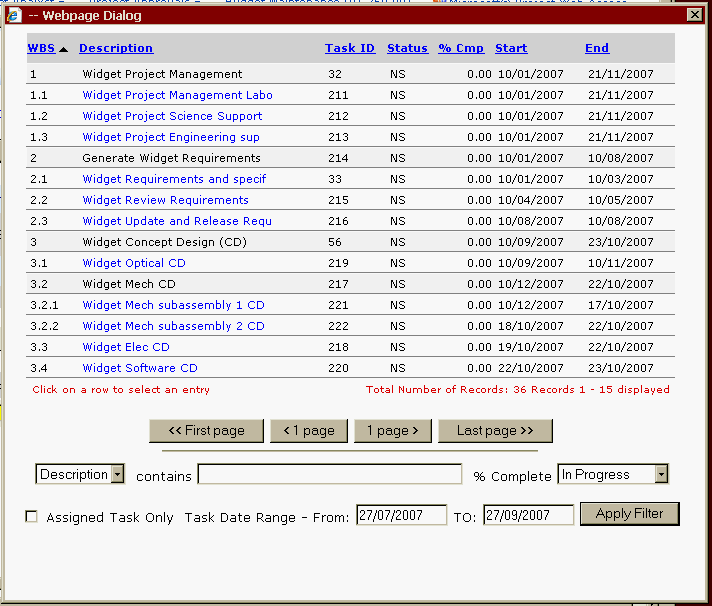 Here are the descriptions of each column
 - The WBS column gives the Work Breakdown Structure ID for the task in question. Project managers will specify tasks using the WBS.
- The Description column gives the name of the task as known to Microsoft Project (truncated to 30 characters)
- The Task ID column is the Microsoft Project UID (Unique ID) of the task in question. This value never changes (The WBS ID is not expected to change but we can't lock it, whilst this value is locked). This value is also used by Solomon as the Solomon Task ID.
- The Status column gives the status of a task. An abbreviation of the possible values in the %Complete drop down in the bottom right area of the dialog.
- The Start column give the schedule start date for the task.
- The End column gives the scheduled end date for the task.
Task Filtering
The task filters triggered by the "Apply Filter" button in the task selection dialog are a little complicated. They are designed to help in cases where you are having trouble finding the right task due to a large number of tasks being display. By default - a range of +/- one month (of todays date, not the timesheet date) is put into the "Task Date Range" entries. When you press "Apply Filter" only tasks in this date range will be displayed. Adjust the range as required If you select "Assigned Tasks Only" and press "Apply Filter", then only tasks assigned to you are displayed. The %Complete drop-down is used to select the task status to be used in the filter.Task Details
Now for each line you need to scroll a little to the right and insert the time (decimal hours) that you spent on that task. You can do this by day (preferred) or just put all the hours into one day (probably better for leave). Use theTab key to move between fields. 
Leave types and General Administrative Tasks
Here is the set of leave tasks available in the AAO leave (Task ID AAO 07 A 001) project.Group Specific Projects
Shortcuts
Duplicating existing Timecards
In the list of time-cards (see Timecard layout above), for any completed/rejected/approved Timecard, you have the option of duplicating that Timecard. If you invoke this, then a new Timecard is created for the currently selected "Timecard Period Ending date" that has the same set of tasks as the source timecard - through all the reported hours are set to zero. This would often by the best way to start a Timecard.Quicker Access
The Business Portal Quick Links menu, near the top right of the screen, allows you to add a page to a set of quick links available when you enter BP. Consider adding the Timecard entry screen to this.Lists of assignments
The ProjectAssignmentInquiry page shows you how to get a list of all your assignments.Page Security settings
These settings make this page visible by all.- Set ALLOWTOPICVIEW = AAOGeneralGroup, TWikiAdminGroup, TWikiGuest


| I | Attachment | History | Action | Size | Date | Who | Comment |
|---|---|---|---|---|---|---|---|
| |
ProjectSelectionDialog.gif | r1 | manage | 17.9 K | 2007-08-27 - 03:27 | TonyFarrell | Project Selection Dialog |
| |
TaskSelectionDialog.gif | r1 | manage | 22.6 K | 2007-08-27 - 03:28 | TonyFarrell | Task Selection Dialog |
| |
TimecardEntryItems.gif | r3 r2 r1 | manage | 87.0 K | 2007-08-27 - 02:26 | TonyFarrell | Image of power-point file - allocating numbers to time card entry |
| |
TimecardEntryItems.ppt | r2 r1 | manage | 82.5 K | 2007-08-27 - 02:25 | TonyFarrell | Power point used to create TimecardEntryItems.gif |
| |
businessframeworkwarn.gif | r1 | manage | 9.8 K | 2007-04-02 - 22:36 | TonyFarrell | Microsoft Business Framework install message. |
| |
businessport-entry.gif | r1 | manage | 53.8 K | 2007-04-02 - 23:29 | TonyFarrell | Business Portal Entry page. |
| |
timecard-entry.gif | r1 | manage | 20.0 K | 2007-04-02 - 23:29 | TonyFarrell | Timecard Entry page. |
| |
timecard-initial.gif | r2 r1 | manage | 44.9 K | 2007-08-27 - 02:00 | TonyFarrell | A Timecard |
Topic revision: r11 - 2008-06-13 - TonyFarrell

Ideas, requests, problems regarding TWiki? Send feedback